


OpenCV is an awesome, powerful image-processing, computer vision and deep learning library. It would not be a joke to say that it is the god of all computer vision libraries.
In this article, we are going to look at the image drawing capabilities of OpenCV and how we can draw its very own logo with that.
Prerequisites - All You Need
To be able to successfully work with this tutorial all we need is Python and OpenCV installed.
Here, we are going to use pip to install OpenCV, which directly installs the wheel file without us worrying about the manual build process. We can surely do a manual build, but that itself would need a separate write-up (check this already available awesome guide).
We are going to work in a virtual environment for this activity (considering we have python already installed, if not please check this). To create this environment follow the below steps in the terminal:
~ % mkdir opencv_logo_proj
~ % cd opencv_logo_proj
opencv_logo_proj ~ % python3 -m venv venv
This creates a virtual environment in our working directory opencv_logo_proj if we notice there is a folder created named venv in the directory.
To activate this venv, we can do the following:
opencv_logo_proj ~ % source venv/bin/activate
(venv) opencv_logo_proj ~ %
(venv) prefix in terminal means that this environment is active for us to do the work. Now nothing outside of it will be affected and libraries will only be installed in this environment.
So moving on, first we upgrade the pip, setuptools and wheel packages in python's virtual environment (to avoid any unwanted errors).
(venv) ~ % pip install --upgrade pip setuptools wheel
When you run the above command, it upgrades pip, setuptools and wheel in one go. Let's install OpenCV now.
(venv) ~ % pip install opencv-contrib-python
We are going to install OpenCV with all its main modules and contrib modules (this contains ongoing work, but mostly a stable version).
After you hit enter on that, you should see something like this:
Collecting opencv-contrib-python
  Downloading opencv_contrib_python-4.5.1.48-cp38-cp38-macosx_10_13_x86_64.whl (51.3 MB)
     |████████████████████████████████| 51.3 MB 7.5 MB/s
Collecting numpy>=1.17.3
  Downloading numpy-1.20.2-cp38-cp38-macosx_10_9_x86_64.whl (16.0 MB)
     |████████████████████████████████| 16.0 MB 3.9 MB/s
Installing collected packages: numpy, opencv-contrib-python
OpenCV is dependent on NumPy, hence it installs that as well. If you faced any issue during the OpenCV installation, please reach out to me in the comments.
Let's move on to the fun part.
OpenCV Logo Using OpenCV
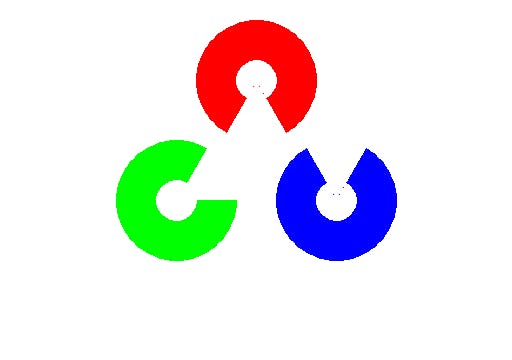
Our objective is to draw this:

Let's create a file, name it openCvSymbolDrawing.py (or whatever you like). Add the following lines of code in it:
# ./opencv_logo_proj/openCvSynmbolDrawing.py

import cv2
import numpy as np

#output image
img = np.full((360, 512, 3), 255, dtype="uint8")
- First, we import required libraries,
import cv2imports OpenCV computer vision library andimport numpy as npimports numpy with an aliasnp. - Then we create the output image where we will draw the OpenCV logo. OpenCV works with NumPy under the hood and treats images as NumPy arrays.
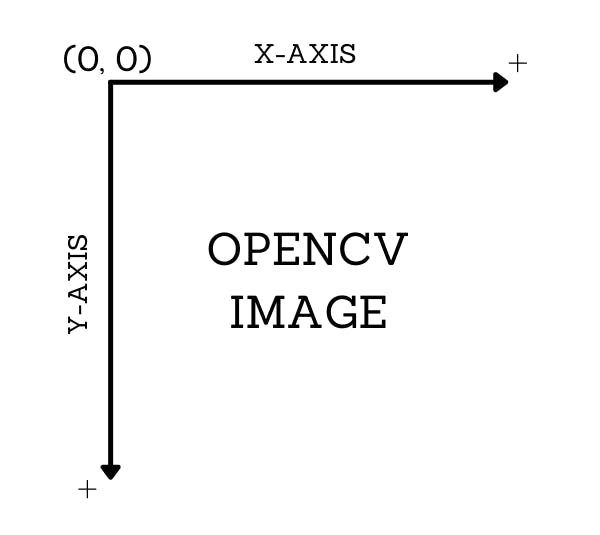
The important thing to note here is that the dimensions (360, 512, 3) are measured from the top-left corner of the image. So, it took 360 points downwards (y-axis) from that corner and took 512 points towards the right (x-axis) from that corner and 3 represents it is a 3-dimensional array (also represents its a 3 channel image, namely - Blue, Green, Red), which by the way all BGR images are in OpenCV (GRAY images are 2-dimensional).
Now, there are several drawing utilities present in cv2 that can help us to achieve the desired results. Here, we are going to look at the ellipse form to draw the logo. Add the following code in the file:
# ./opencv_logo_proj/openCvSynmbolDrawing.py

img = cv2.ellipse(img, (256, 80), (60,60), 120,0,300,(0,0,255),-1)
img = cv2.ellipse(img, (256, 80), (20,20), 120,0,300,(255,255,255),-1)
img = cv2.ellipse(img, (176, 200), (60,60), 0,0,300,(0,255,0),-1)
img = cv2.ellipse(img, (176, 200), (20,20), 0,0,300,(255,255,255),-1)
img = cv2.ellipse(img, (336, 200), (60,60), 300,0,300,(255,0,0),-1)
img = cv2.ellipse(img, (336, 200), (20,20), 300,0,300,(255,255,255),-1)

font = cv2.FONT_HERSHEY_SIMPLEX
img = cv2.putText(img, "OpenCV", (196,296), font, 1, (0,0,0), 4, cv2.LINE_AA)
- We use
cv2.ellipseto draw an ellipse on the imageimg. It takes image name on which it needs to drawimg, centre coordinates that represent the centre of the ellipse(256, 80), axes length that represents major and minor axes of ellipse(60, 60), rotation angle at which ellipse needs to be rotated120degrees, start angle0degrees, end angle300degrees, colour ellipse uses(0, 0, 255)for red ellipse and the last parameter is thickness when set to-1that fills the drawing with the given colour. This would make an ellipse like below:

img = cv2.ellipse(img, (256, 80), (20,20), 120,0,300,(255,255,255),-1)this statement creates a concentric ellipse to fill white color to get a desired shape.

- Similarly, the next couple of statements creates green and blue ellipse with desired shapes.
img = cv2.ellipse(img, (176, 200), (60,60), 0,0,300,(0,255,0),-1)
img = cv2.ellipse(img, (176, 200), (20,20), 0,0,300,(255,255,255),-1)
We get a green ellipse of the logo.

img = cv2.ellipse(img, (336, 200), (60,60), 300,0,300,(255,0,0),-1)
img = cv2.ellipse(img, (336, 200), (20,20), 300,0,300,(255,255,255),-1)
At last, we draw a blue ellipse of the logo.
- Next, we can add some more information if we want, like text. Here, we set a font with
font = cv2.FONT_HERSHEY_SIMPLEXtakes hershey simplex font, which we can use to style the text. img = cv2.putText(img, "OpenCV", (196,296), font, 1, (0,0,0), 4, cv2.LINE_AA)this puts text on the image and takes following parameters, image where it needs to put text onimg, textOpenCV, position of the text bottom-left coordinates(196,296), font stylefontwhich we defined earlier, font scale1, color of text(0,0,0), thickness of4and lastly type of linecv2.LINE_AA(it is optional, we can also skip this).
Now, we display our final result and save the output, add the following code to the file:
# ./opencv_logo_proj/openCvSynmbolDrawing.py

cv2.imshow("OpenCV Logo", img)
cv2.waitKey(0)
cv2.destroyAllWindows()
cv2.imwrite('opencvlogo.png', img)
- We use the
cv2.imshowmethod to output the image for display but simply sayingimshowmeans that it will show that image for a couple of milliseconds and complete the program and exits the terminal. We don't want that, we need to be able to see the image for as long as we want, right? - Here comes the use of
cv2.waitKeythat takes a parameter, say,0to let the system know to wait for a certain keypress until it exits the process. By giving0as the value, it means any keypress would continue the program and exit the process. To clear the display output we need to usecv2.destroyAllWindows()explicitly after usingcv2.waitKey(0)to let system know to clear the output. - Lastly, we save the result using
cv2.imwrite('opencvlogo.png', img)that takes the image file name and image to be saved.
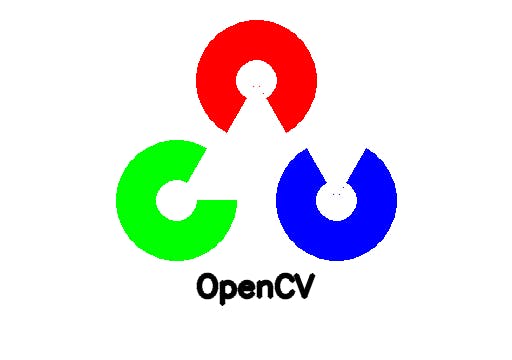
The final output would look something like this:
Conclusion, Already?
Yeah, that's about it. We were able to draw a symbol almost (I would say 99%) similar to the actual logo. I hope you enjoyed the process of using a powerful yet simple to use library like OpenCV.
It was a fun activity I did, back during my college days. Hoping this would inspire you to pursue and look further at the capabilities of computer vision and image processing.
If you need more fun activities like this on computer vision, don't forget to check out OpenCV-Python-Computer-Vision.
Just starting your Open Source Journey? Don't forget to check Hello Open Source
Need inspiration or a different perspective on the Python projects or just out there to explore? Check Awesome Python Repos
Want to make a simple and awesome game from scratch? Check out PongPong
Want to
++your GitHub Profile README? Check out Quote - README
Till next time!
Namaste 🙏