Table of contents
In this 3 part series, we will be making a game, using python game programming library pyglet.
Check out 1st Part here.
What We Learned So Far ?
- We know what pyglet is and how to design the PongPong game.
- We have the project structure and created main
pongpong.pyfile. - We created the Walls, Paddle and Ball classes, initialised with some very important variables (which we will use here).
- We learned the use of those variables and why are they important.
In this part, we will explore on how to create a game window and how to load our game objects (with no active gameplay, they will be still waiting for the next part !).
So let's begin !
Main PongPong
In the last part, we had coded the dimensions and speed of ball when loaded initially.
It was like this:
# ./PongPong/pongpong.py

# Variables, Considering a vertical oriented window for game
WIDTH = 600   # Game Window Width
HEIGHT = 600  # Game Window Height
BORDER = 10   # Walls Thickness/Border Thickness
RADIUS = 12   # Ball Radius
PWIDTH = 120  # Paddle Width
PHEIGHT = 15  # Paddle Height
ballspeed = (-2, -2)    # Initially ball will be falling with speed (x, y)
paddleacc = (-5, 5)   # Paddle Acceleration on both sides - left: negative acc, right: positive acc, for x-axis
Lets create our window and load the game objects:
# ./PongPong/pongpong.py

import pyglet
from pong import load

class PongPongWindow(pyglet.window.Window):
    def __init__(self, *args, **kwargs):
        super(PongPongWindow, self).__init__(*args, **kwargs)

        self.win_size = (WIDTH, HEIGHT)
        self.paddle_pos = (WIDTH/2-PWIDTH/2, 0)
        self.main_batch = pyglet.graphics.Batch()
        self.walls = load.load_rectangles(self.win_size, BORDER, batch=self.main_batch)
        self.balls = load.load_balls(self.win_size, RADIUS, speed=ballspeed, batch=self.main_batch)
        self.paddles = load.load_paddles(self.paddle_pos, PWIDTH, PHEIGHT, acc=paddleacc, batch=self.main_batch)

    def on_draw(self):
        self.clear()
        self.main_batch.draw()


game_window = PongPongWindow(width=WIDTH, height=HEIGHT, caption='PongPong')
game_objects = game_window.balls + game_window.paddles

for paddle in game_window.paddles:
    for handler in paddle.event_handlers:
        game_window.push_handlers(handler)
We will see what is happening line-by-line:
First we import
pygletand ourloadmodule (we will look at this in a few points later).class PongPongWindow(pyglet.window.Window):this defines the game window class, that inherits theWindowclass functionality frompyglet.window(it is used to create still window in pyglet). After inheriting this, we have all its methods likeself.on_draw().Next in
__init__method ofPongPongWindowwe initialize the base class usingsuperfunction. What is super?We are using
def __init__(self, *args, **kwargs):, here*argsand**kwargsare used to unpack any passed arguments and key-word arguments respectively. They are useful as we don't know which arguments we will be using later on while creating a window and initialising it usingsuper.self.win_size = (WIDTH, HEIGHT)a class variable to be used for created elements on window to hold their positions.self.paddle_pos = (WIDTH/2-PWIDTH/2, 0)paddle's position. Here,WIDTH/2will return the center of window but paddle's coordinate starts at bottom-left, that means, if we only set paddle's position toWIDTH/2then its bottom-left would be atWIDTH/2but we don't want that (because it would feel like the paddle is not in center). To rectify that, we need to subtractPWIDTH/2(half of paddle's width) fromWIDTH/2, since we need to shift the paddle to left by half to make it in center, so that paddle's center would be atWIDTH/2(If it seems tricky, get a pen and a paper and draw window and paddle and see how this makes sense, but don't forget everything in pyglet space starts from bottom-left).self.main_batch = pyglet.graphics.Batch(), we create a batch now. Batch is something that groups different elements that needs to be drawn and draw then in a single call. For example, if we need to draw a rectangle and a circle, so during window creation and loading of objects, we would need to call a method likedraw2 times, 1 for rectangle and 1 for circle, but using a batch makes it even simpler, so if we club that rectangle and that circle in same batch, then just calling that batch'sdrawwill draw both rectangle and circle in a single call. It is helpful to limit the code we write and make the code scalable.self.walls = load.load_rectangles(self.win_size, BORDER, batch=self.main_batch),self.balls = load.load_balls(self.win_size, RADIUS, speed=ballspeed, batch=self.main_batch)andself.paddles = load.load_paddles(self.paddle_pos, PWIDTH, PHEIGHT, acc=paddleacc, batch=self.main_batch), all these create and load the objects on game window (but still not drawn). Here, walls and ball creation takes window sizeself.win_sizeand paddle takes paddle positionself.paddle_pos, followed byBORDERfor walls,RADIUSfor ball andPWIDTH,PHEIGHTandpaddleaccfor paddle (to know more about these constants variable please follow part 1). Then we pass the batchself.main_batch, this batch will contain all these walls, ball and paddle, we passed same batch to all 3 load methods. All these load functions will return a list containingnnumber of walls, balls and paddles (in our case it will be 3 walls, 1 ball and 1 paddle, but we can scale it to havennumber of these). We will see later how these load methods work with all these passed arguments.def on_draw(self):this is a method present in the super class, we override it to draw the things we want.self.clear()clears anything and everything present in memory of window creation if present. May be helpful in simultaneous window creation, but a good practice to use this.self.main_batch.draw()then we draw the batch that contains all loaded objects (only 1 call to draw and everything will be available).
Now we move out of the class PongPongWindow.
game_window = PongPongWindow(width=WIDTH, height=HEIGHT, caption='PongPong')now we create the game window we defined. We pass the width and height parameters with a caption to the window.game_objects = game_window.balls + game_window.paddleswe define game objects that needs to be moved or that involves some position changes throughout the game. Ball and Paddle created are in a list returned by load functions.
Then comes the for loop:
for paddle in game_window.paddles:
    for handler in paddle.event_handlers:
        game_window.push_handlers(handler)
In this for loop, for every paddle in game window, we push its event handlers to game window to let it know that whenever some particular event occurs please know that it belongs to certain element in window.
Secondly, why are we using a for loop to push event handlers when we have only 1 paddle ? Its because maybe in future if there is a case where we want another paddle to be made, then just adding that paddle in load function will be enough and hence promotes the scalability, as there will be no further change in main file.
Well, so much we have covered, now lets move on to creating load functions that are used to load the objects.
Load Functions
The load functions are the ones that we used in PongPongWindow class to help load the objects and store those objects in main batch.
Lets start its code.
- Importing required modules,
ball,paddleandrectangle, these have the required classes.
# ./PongPong/pong/load.py

from . import ball, paddle, rectangle
from typing import Tuple
- We will create
load_ballsfunction first. Code would look something like this:
def load_balls(win_size : Tuple, radius : float, speed : Tuple, batch=None):
    balls = []
    ball_x = win_size[0]/2
    ball_y = win_size[1]/2
    new_ball = ball.BallObject(x=ball_x, y=ball_y, radius=radius, batch=batch)
    new_ball.velocity_x, new_ball.velocity_y = speed[0], speed[1]
    balls.append(new_ball)
    return balls
- Here, first we create a list
ballsthat will containnnumber of balls, in this case it will have only 1 ball. ball_xandball_ydefines the (x, y) coordinate of ball on the window, this point will be the point of ball's origin, that will be bottom-left of ball.new_ballcontainsBallObjectinstance, that takes(x, y, radius, batch), all these are the arugments of__init__method of classpyglet.shapes.Circlethat was inherited byBallObject.xandycontains the position values of (x, y) coordinate of ball, that would be bottom-left (I don't know how they calculate bottom-left of a circle !), then there isradiusof the ball and thebatchargument to specify that which batch it belongs to (remember we passedself.main_batchin batch inpongpong.pyfile).new_ballhas attributesvelocity_xandvelocity_y(to know more go through part 1), here we assign them their initial value, that is,ballspeed = (-2, -2)frompongpong.py, that means, it will be falling along a line that intersects at point(-2, -2).- Finally we append the created ball to the list
ballsand return that list.
So that's how loading of ball takes place in the PongPong window. Any doubt, use comments to reach out !
- Lets create similar load function for paddle.
def load_paddles(paddle_pos : Tuple, width : float, height : float, acc : Tuple, batch=None):
    paddles = []
    new_paddle = paddle.Paddle(x=paddle_pos[0], y=paddle_pos[1], width=width, height=height, batch=batch)
    new_paddle.rightx = new_paddle.x + width
    new_paddle.acc_left, new_paddle.acc_right = acc[0], acc[1]
    paddles.append(new_paddle)
    return paddles
- Create
paddleslist to contain all paddles created. new_paddlecontains instance of classPaddlethat takes(x, y, width, height, batch), these arguments are defined in inherited classpyglet.shapes.Rectangle,xandydefines bottom-left coordinate of rectangle/paddle,widthandheightof paddle andbatchcontains batch object in which it will reside (that is,self.main_batch). To know more aboutPaddleclass structure, read through part 1.new_paddle.rightxcontains the right most x-coordinate of paddle, that we will use to detect collision with right wall.new_paddle.acc_leftandnew_paddle.acc_rightboth defines the amount of points they will move whenever left and right arrow keys are pressed respectively.- Finally we append the created paddle to the list and return the
paddles.
Hence, we have the paddle load function ready.
Lets look at the final function to load walls.
def load_rectangles(win_size : Tuple, border : float, batch=None):
    rectangles = []
    top = rectangle.RectangleObject(x=0, y=win_size[1]-border, width=win_size[0], height=border, batch=batch)
    left = rectangle.RectangleObject(x=0, y=0, width=border, height=win_size[1], batch=batch)
    right = rectangle.RectangleObject(x=win_size[0] - border, y=0, width=border, height=win_size[1], batch=batch)
    rectangles.extend([left, top, right])
    return rectangles
- Create
rectangleslist to contain all the rectangles created (in this case they will act as walls). - Create
top,leftandrightvariables, that will show the respective walls. - Each wall variable is assigned to instance of
RectangleObjectthat takes(x, y, width, height, batch), these arguments are passed to the class inheritedpyglet.shapes.RectanglebyRectangleObject. These variables are same as defined for paddle. - After instantiating all 3 walls, we append them to
rectangleslist and return that.
Pheww ! All the load functions are ready and already in use in PongPongWindow class in pongpong.py file.
Lets revisit main pongpong.py file to run the app.
Add following at the end of pongpong.py file:
# ./PongPong/pongpong.py

if __name__ == '__main__':
    pyglet.app.run()
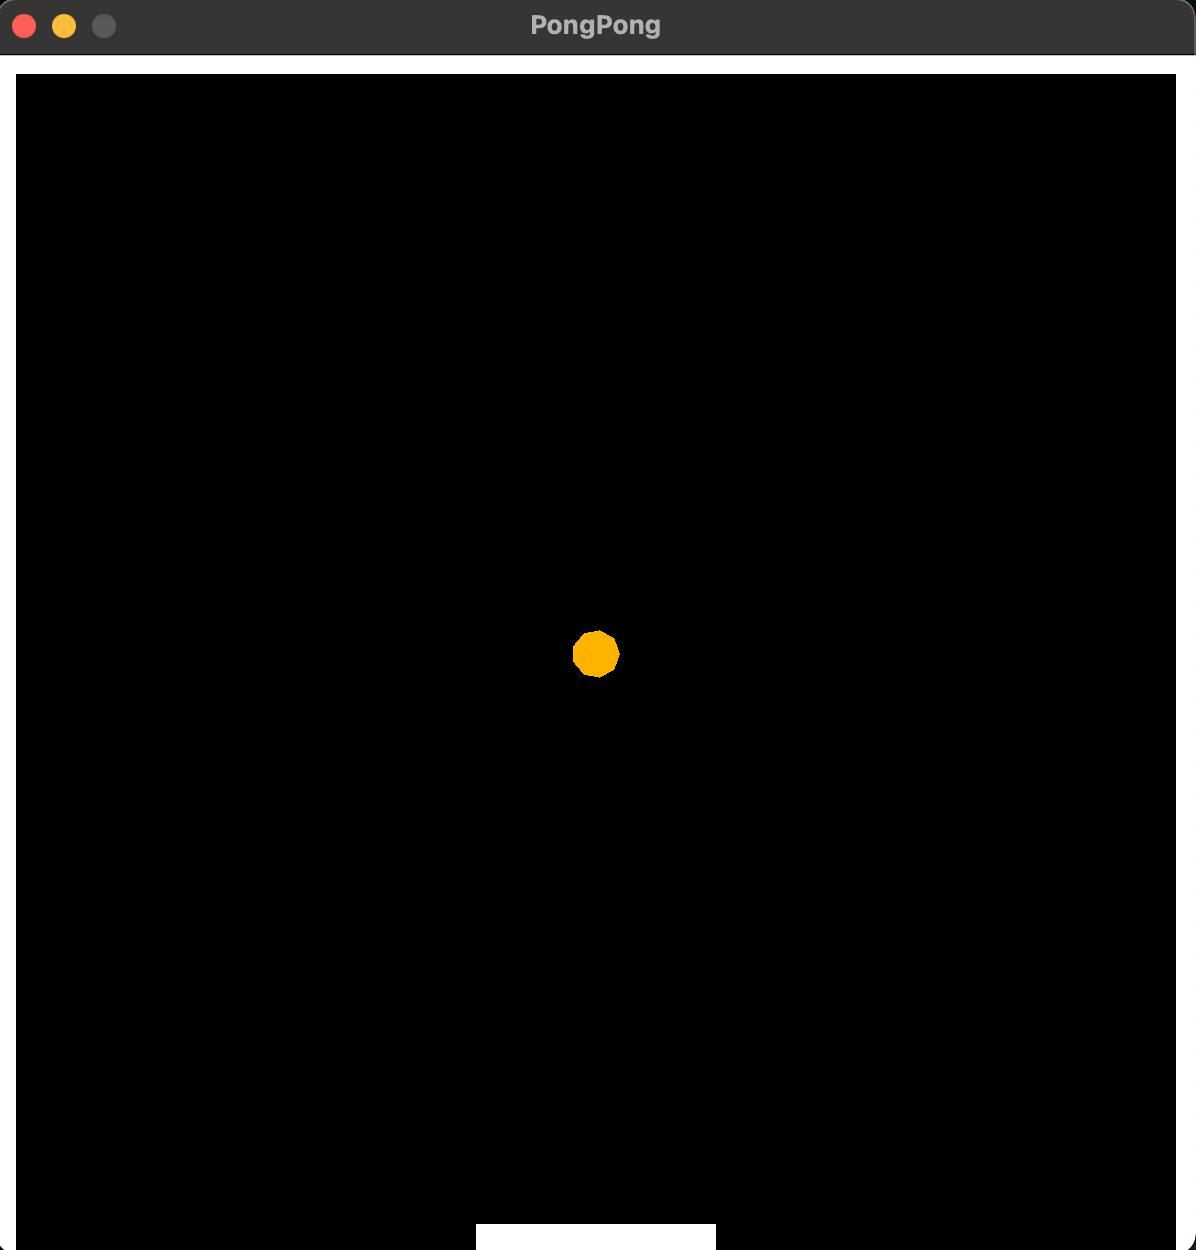
Run the file and the output would look something like this:

See, ball is in the center, paddle is in the center and walls are looking good !
Hence, so far we have done awesomely amazingly well !
Well that was it, in this part we learned:
- How to load our game window.
- How to load elements in that game window and how to code those load functions.
- How to push event handlers to game window if there are any for the elements presents.
- How to run pyglet app, that is, using
pyglet.app.run.
If you followed this step-by-step and have some doubts, I would be very happy to get them sorted (maybe I will learn something new 😁). Make sure to drop them in the comments !
If you can't wait for next part, please visit this repo to know more about the project code.
In next part, we will see how to make function to introduce the ability for elements to interact with each other.
So, stay tuned !
UPDATE: Part 3 is released, read here
Just starting your Open Source Journey ? Don't forget to check out Hello Open Source
Want to ++ your GitHub Profile README ? Check out Quote - README
Till next time !
Namaste 🙏

